 Visona
Manual
Visona manual
Everything you need to install Visona, connect it to your music and read what it shows. Hover over any control in Visona for a tooltip; on a touchscreen, hold a finger on it for half a second.
1FAQ
When I move my track's volume fader, the waveform doesn't change.
Visona sits in an insert slot, and in most DAWs inserts come before the track fader, so Visona sees the signal before the fader. To watch the level after the fader, put the track in a group and Visona on the group, or put Visona on a return or the master.
In Ableton Live the waveform lands a little after the grid.
A plugin with latency, such as a lookahead limiter or a linear-phase EQ, sits before Visona. Live tells every plugin on the track the same playhead, so the audio reaching Visona is late by that latency. Route Visona Sync to Visona's sidechain and Visona measures the latency and moves the audio back onto the grid. See Latency and Visona Sync.
The app shows MIDI CLOCK LOST.
MIDI Clock stopped arriving for more than half a second while the transport ran. Check that your DAW sends MIDI Clock to the port chosen in Settings → MIDI input. To keep watching without clock, press Run free (or Space). See MIDI Clock sync.
macOS says Visona can't be opened.
The builds are not notarized yet. Remove the quarantine flag with xattr -cr /path/to/Visona.app and open it again. For the plugins, see Installing the plugins.
Ableton Live doesn't list the CLAP plugin.
Live doesn't load CLAP plugins. Use the VST3 or, on macOS, the AU in Live. Reaper and Bitwig Studio load CLAP.
Does Visona change my audio?
No. The plugin is a pass-through effect: the audio goes to the output unchanged while Visona analyzes it. Visona Sync is a separate instrument that only writes a click for Visona's sidechain.
Pinch doesn't zoom on my Raspberry Pi touchscreen, but taps and drags work.
The desktop still turns touches into mouse events. See Touchscreen.
2Introduction
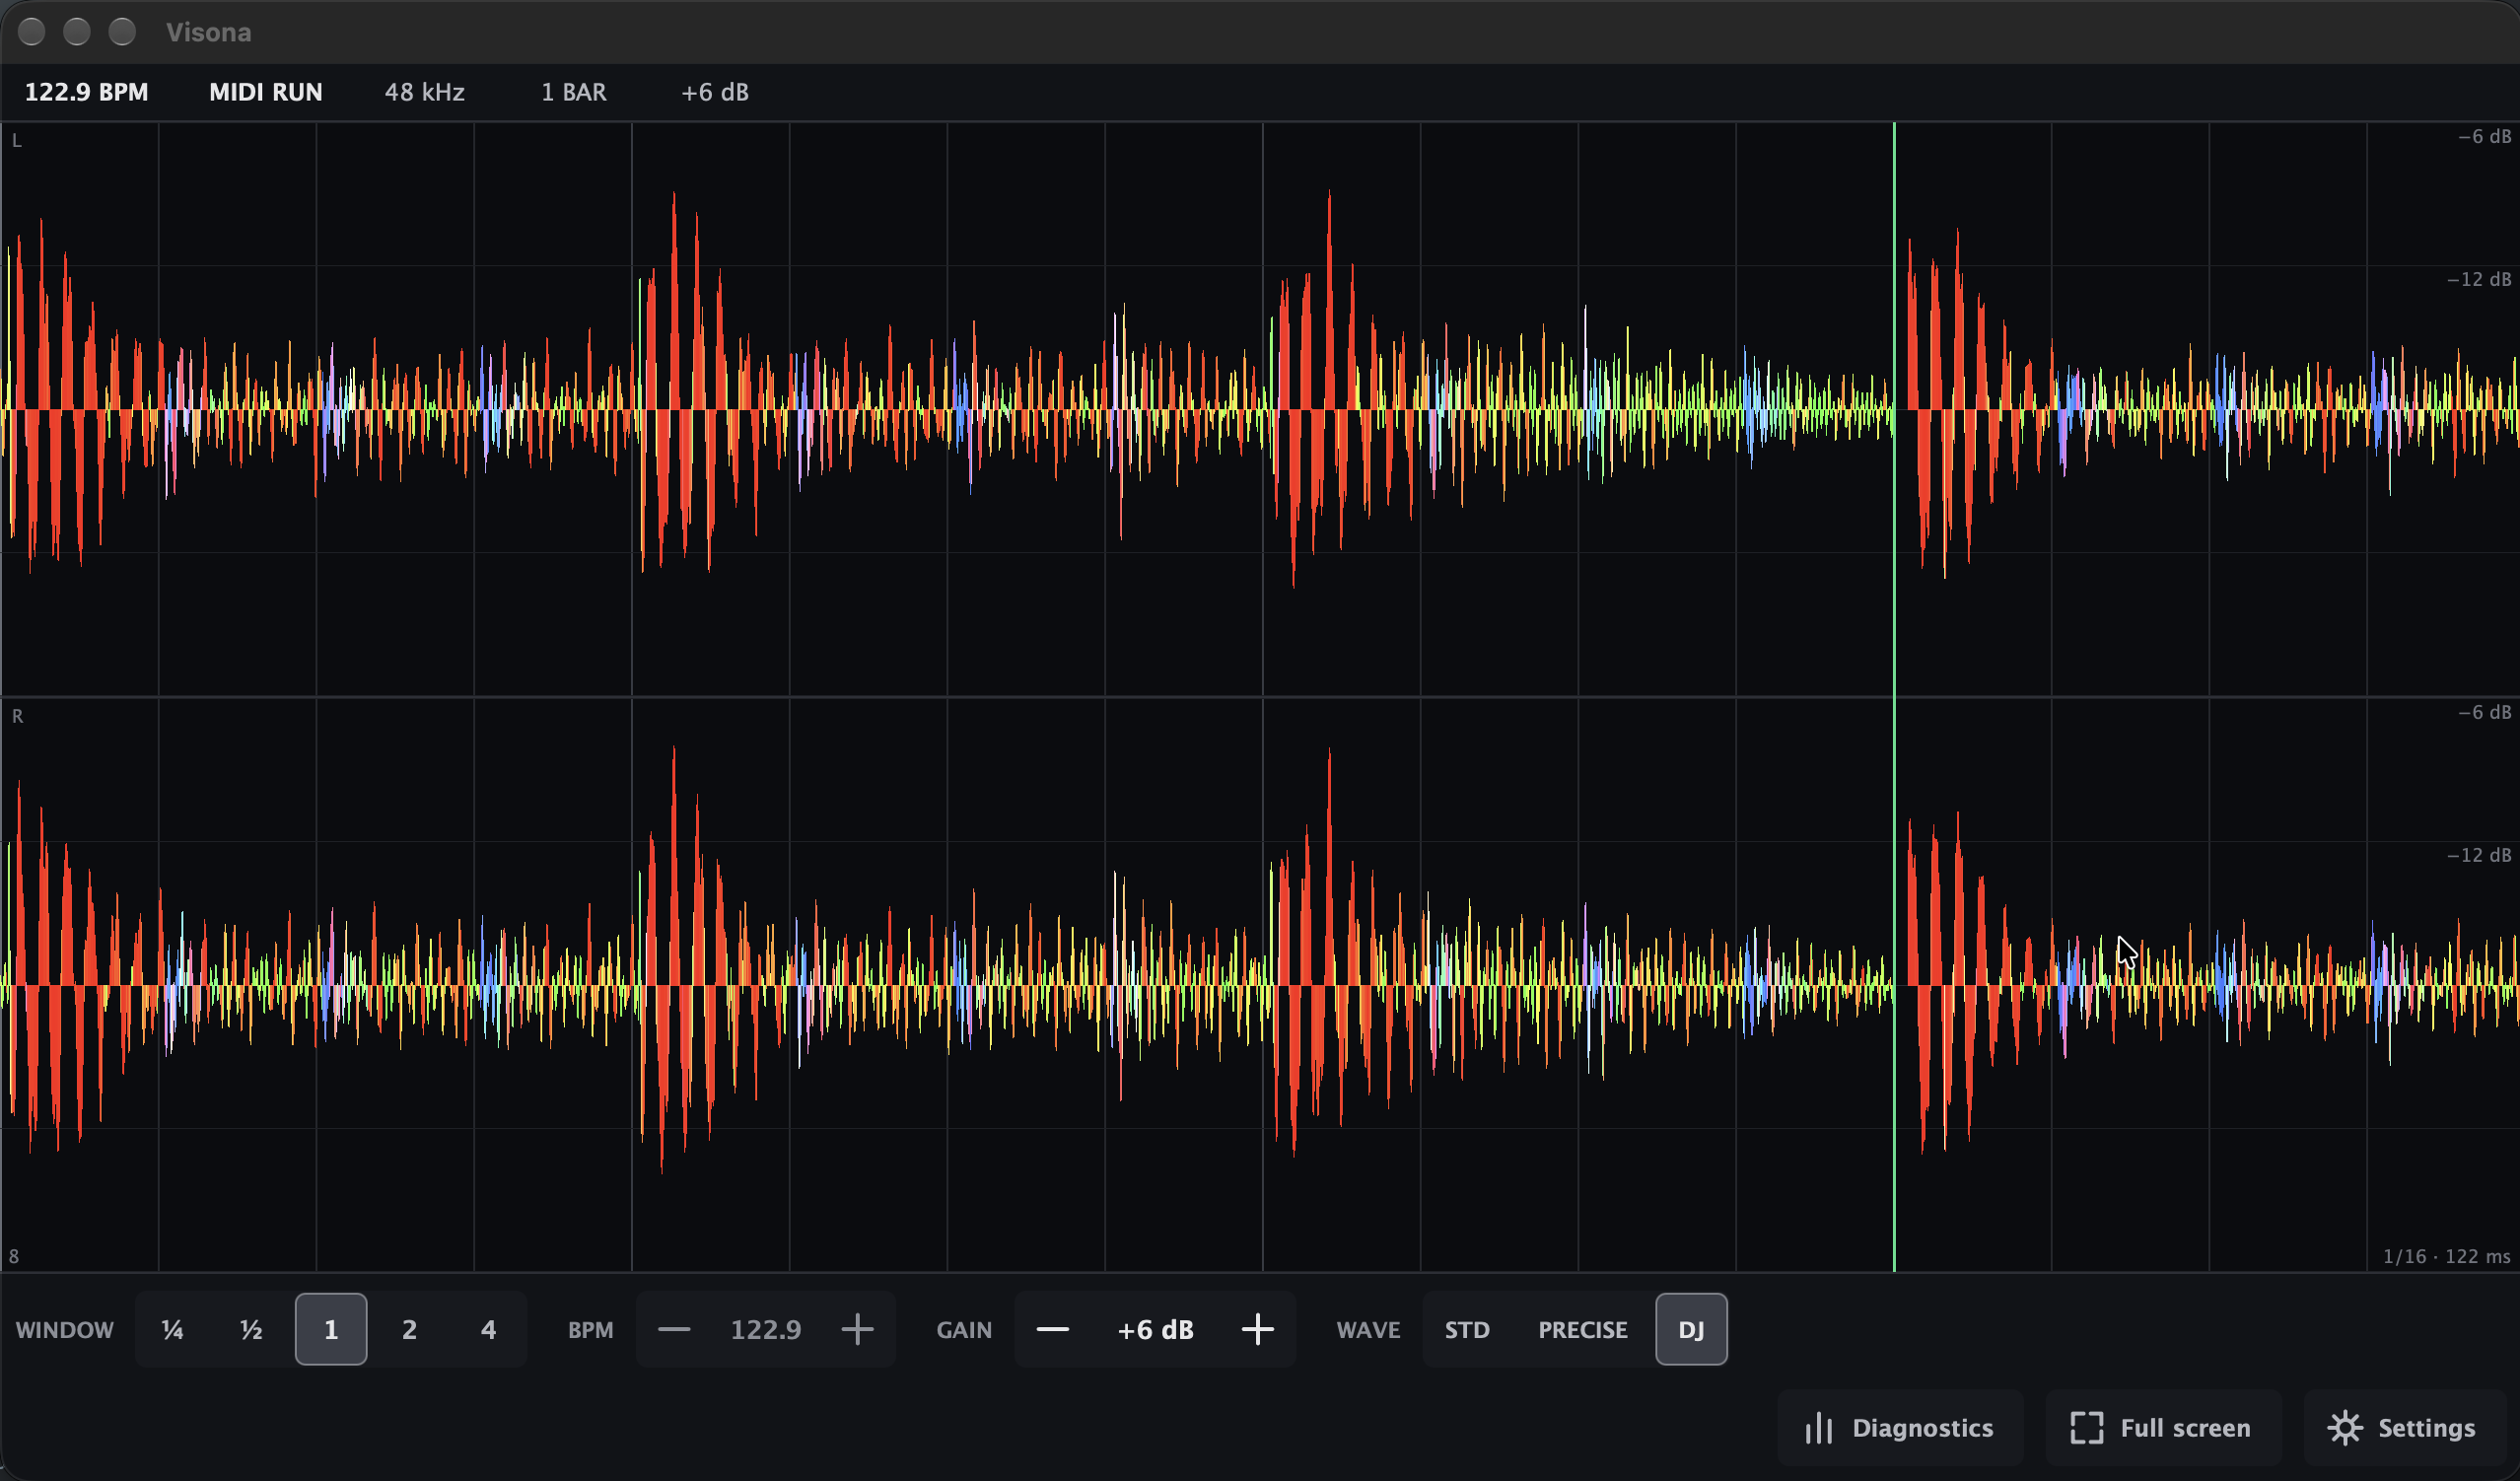
Visona is a beat-synced stereo oscilloscope for music production. It draws your audio as a sweep that runs from left to right across one window of musical time, from a quarter bar to four bars, and starts over at the next window. Because the sweep is locked to the bar, a kick that sits on the beat lands on the same grid line every pass, and you see timing, transients and envelopes in their musical context.
Visona comes in two forms:
- The app, for macOS on Apple Silicon and Raspberry Pi. It listens to an audio interface and follows MIDI Clock from your DAW, or runs free at a tempo you set. On a Raspberry Pi with a screen it becomes a dedicated studio display.
- The plugins, VST3, AU and CLAP on macOS and VST3 and CLAP on Windows and Linux. Visona is a pass-through stereo effect that follows the DAW's transport directly. Visona Sync is a companion instrument that measures latency for it.
Visona is free, open-source software under the AGPL-3.0. It is in alpha: things change from release to release, and your feedback shapes what comes next.
3Downloading Visona
Downloads are on the download section of this site, with the newest alpha, beta and stable release. Each file is a zip or tarball for one platform and format; download only those you need. The SHA-256 next to each file lets you check that the download is intact.
| You want | Download |
|---|---|
| The app on a Mac | Visona-macos-arm64.zip |
| The app on a Raspberry Pi | Visona-linux-arm64-pi.tar.gz, or install over SSH (below) |
| The plugin | Visona-<format>-<platform>, for example Visona-vst3-windows-x64.zip |
| Visona Sync | Visona-sync-<format>-<platform> |
Links that always point to the newest build have the form visona.org/download/latest/<file>/, such as /download/latest/macos-arm64/.
4Installing the app
macOS
The app needs a Mac with Apple Silicon and macOS 14 or later. Unzip Visona-macos-arm64.zip, move Visona.app to Applications and open it. If macOS blocks it, run:
xattr -cr /Applications/Visona.appThe first time, macOS asks for permission to use the microphone. Visona needs it to read any audio input, including your audio interface.
Raspberry Pi
Visona runs on Raspberry Pi OS 64-bit with the desktop. Over SSH, this installs the newest release to ~/visona and starts Visona full screen at login:
curl -fsSL https://raw.githubusercontent.com/stephanterning/visona/main/scripts/pi/install-visona.sh | bashRun the same command again to upgrade; your settings are kept. The Pi setup guide covers flashing the card and setting up the audio interface, and the kiosk guide covers autostart, displays and touchscreens.
On Linux and the Raspberry Pi, a USB audio interface must run in class compliant mode. Use a powered USB hub or the interface's own power supply.
5Installing the plugins
Unpack each archive and copy the bundle into the folder for its format. Create the folder if it doesn't exist, then restart your DAW or rescan its plugins. Hosts list the plugins as Stephan Terning → Visona and Stephan Terning → Visona Sync.
| Platform | Format | Install folder |
|---|---|---|
| macOS | VST3 | ~/Library/Audio/Plug-Ins/VST3/ |
| AU | ~/Library/Audio/Plug-Ins/Components/ | |
| CLAP | ~/Library/Audio/Plug-Ins/CLAP/ | |
| Windows | VST3 | C:\Program Files\Common Files\VST3\ |
| CLAP | C:\Program Files\Common Files\CLAP\ | |
| Linux | VST3 | ~/.vst3/ |
| CLAP | ~/.clap/ |
macOS
The plugin builds are not notarized. After copying, remove the quarantine flag and sign the bundles on your Mac, or your DAW may refuse to load them. For VST3, for example:
cd ~/Library/Audio/Plug-Ins
xattr -cr VST3/Visona.vst3 VST3/Visona\ Sync.vst3
codesign --force --sign - --deep VST3/Visona.vst3
codesign --force --sign - --deep VST3/Visona\ Sync.vst3
Do the same for Components/*.component and CLAP/*.clap if you installed those. If a new AU doesn't show up, run killall -9 AudioComponentRegistrar and restart the DAW. In Ableton Live, turn on Use Audio Units under Settings → Plug-Ins and press Rescan.
Windows
Before unpacking, right-click each zip, choose Properties and tick Unblock, or run Unblock-File .\Visona-*.zip in PowerShell. Copying into Common Files needs administrator rights. No Visual C++ redistributable is needed.
Linux
Supported on x86_64 with Ubuntu 24.04, Debian 13, Fedora 39 or newer. No signing is needed:
mkdir -p ~/.vst3 ~/.clap
tar xzf Visona-vst3-linux-x86_64.tar.gz -C ~/.vst3
tar xzf Visona-clap-linux-x86_64.tar.gz -C ~/.clap6First start of the app
Open Settings with the gear button or Cmd+, (Ctrl+, on Linux). Every choice is saved at once, and Visona opens the same devices next time.
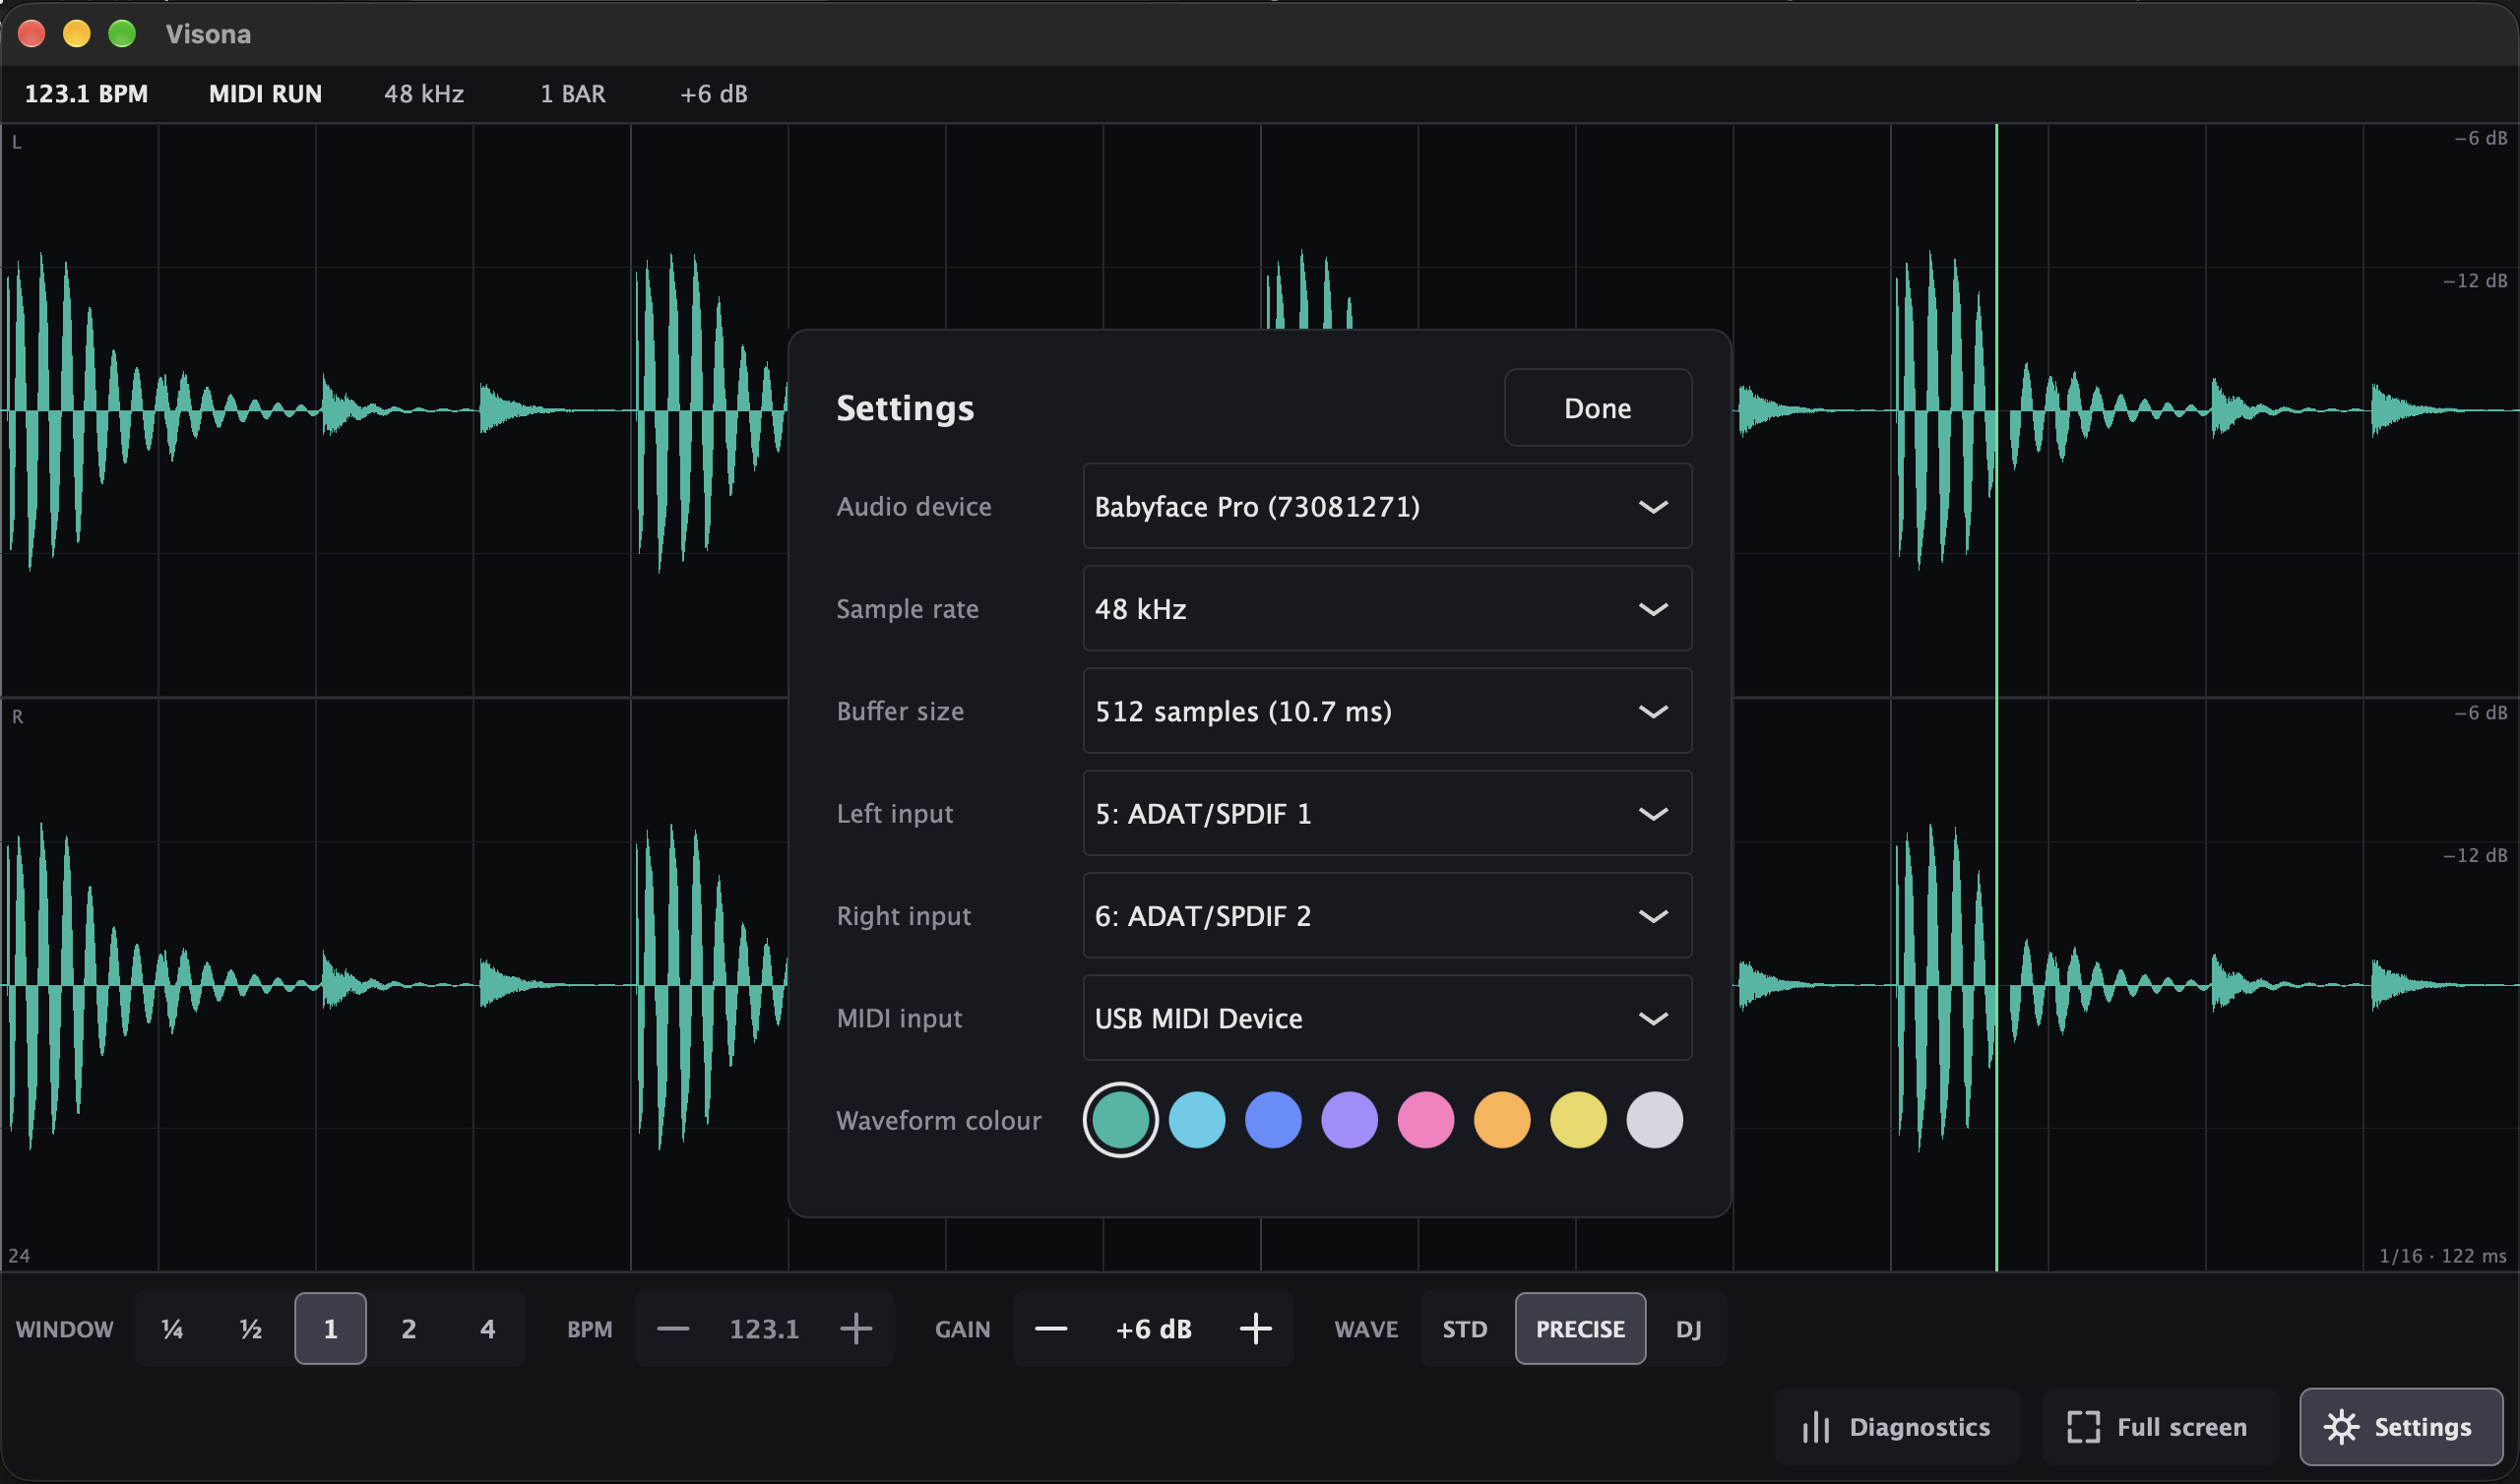
- Audio system, Audio device
- The driver type and the interface Visona listens to.
- Sample rate, Buffer size
- Use the rate your session runs at. A smaller buffer gets the audio to the screen sooner.
- Left input, Right input
- Which inputs of the interface feed the left and right lanes.
- Visona Sync
- An input that receives Visona Sync's bar impulse, or Off. See Visona Sync with the app.
- MIDI input
- The port your DAW sends MIDI Clock to, or None to run free.
- Waveform colour, View
- The colour of the waveform, and buttons for the diagnostics overlay and full screen.
Close the panel with Done or Esc. Audio interfaces and MIDI ports can be unplugged and plugged in again while Visona runs: it shows NO AUDIO INPUT while the device is missing and carries on a few seconds after it returns.
Visona is developed and tested with an RME Babyface Pro FS, but works with any professional USB audio interface.
Running Visona on a separate device
When Visona runs on a different device from the computer playing the music, such as a Raspberry Pi with its own audio interface, connect the two interfaces digitally if you can: S/PDIF, ADAT or AES/EBU. The samples then arrive unchanged, so 0 dBFS in your DAW is 0 dBFS in Visona and the levels you read are exact. Run both interfaces at the same sample rate, with the receiving interface clocked from its digital input.
With an analog connection, match the levels so that 0 dBFS is the same on both sides: the output level of the interface on the computer and the input gain of the interface Visona listens to. Play a sine tone at −12 dBFS from your DAW, open the diagnostics overlay (D) and set the input gain until each input reads −12 dBFS. If the levels don't match, the waveform and its dBFS reference lines show the audio louder or quieter than it is, and too much gain clips the input before Visona sees it.
7Using the plugin in a DAW
- Insert Visona on a stereo track, group, return or the master: wherever you want to see the audio.
- Press Play. The sweep starts at bar 1 and follows the DAW's tempo, position and time signature.
- Stop, and the view freezes and dims with STOPPED in the status bar. Move the playhead and play again, and the scope picks up at the new position.
Use as many instances as you like. Each one saves its own window, gain, auto gain, waveform mode and colour in the project. The plugin has no tempo control, pause button or full-screen button, since the DAW drives it; Settings holds the waveform colour only.
8The screen at a glance
- Status bar, at the top: tempo, sync state, sample rate, window, gain and zoom.
- Zoom strip, under the status bar, only while you are zoomed in.
- Scope: one lane per channel, left above right, with the bar grid and the green write head.
- Control bar, at the bottom: Pause, WINDOW, BPM, GAIN with AUTO, WAVE, then Diagnostics, Full screen and Settings.
The layout adapts to the window. In a narrow window the buttons drop their labels and show only their icons, and in a very small window some controls move behind the gear button.
9Status bar
The status bar only shows; nothing in it is a button. From the left:
| Item | Example | Meaning |
|---|---|---|
| Tempo | 126.0 BPM | From MIDI Clock, the DAW, or your free tempo. |
| State | MIDI RUN | See the list below. |
| Visona Sync | SC +12.3 ms | The measured latency, or SC ... while waiting for the first impulse. Hover for details. |
| Sample rate | 96 kHz | Of the audio input. |
| Window | 1 BAR | The sweep length. |
| Gain | +12 dB, AUTO +6 dB | The display gain. |
| Zoom | ZOOM 4.0× · 1.3–1.4 | Only while zoomed: the factor and the bars in view. |
The state reads:
- MIDI RUN
- The app follows a running MIDI Clock.
- HOST RUN
- The plugin follows the playing DAW.
- STOPPED
- The transport is stopped. The view freezes and dims.
- FREE
- The sweep runs at your own tempo, without clock.
- PAUSED
- You paused the view. This takes precedence over everything else.
- MIDI CLOCK LOST
- Clock stopped arriving while the transport ran. A banner over the scope explains what to do.
- NO INPUT
- No audio input is running. The banner says why; choose a device in Settings.
Red is used only for errors.
10MIDI Clock sync
The app follows MIDI Clock, including Start, Stop, Continue and Song Position Pointer, so it starts at the right bar when you start playback from the middle of a song. In your DAW, send MIDI Clock to a port Visona can see: an output of your audio or MIDI interface, a network MIDI session, or on macOS an IAC bus. Choose that port under Settings → MIDI input.
In Ableton Live, turn on Sync for that output port under Settings → Link, Tempo & MIDI, and set MIDI Clock Type to Song so Live sends Song Position Pointer. The app counts in 4/4.
If clock stops for more than half a second while the transport runs, the state reads MIDI CLOCK LOST and the view freezes until clock returns. The diagnostics overlay shows the MIDI input, the transport, the tempo and the message counts.
11FREE mode and Run free
Without MIDI Clock the app runs free: the sweep moves at the tempo in the BPM control, and the state reads FREE. The app starts in FREE mode and switches to MIDI Clock as soon as clock arrives, so with None as MIDI input it simply stays free.
When MIDI Clock stops or is lost, the first button in the control bar becomes Run free. Press it, or Space, and the sweep carries on at the last clock tempo until MIDI Clock starts again.
12Pause
In the app, Pause (Space or P) holds the view and stops the analysis: use it to study a pass in peace, when movement distracts, or to save CPU. The button turns into a lit Resume, and the state reads PAUSED. While paused, error banners stay hidden; they show again when you resume.
The plugin has no pause button: its view freezes whenever the DAW stops.
13Window
WINDOW sets how much musical time one pass of the sweep covers: ¼, ½, 1, 2 or 4 bars. Keys 1 to 5 pick them directly. A short window shows the shape of a single hit; a long window shows a whole phrase and how its dynamics develop.
14Tempo
The BPM control sets the tempo of the free-running sweep, from 40 to 300 BPM. The − and + buttons step whole BPM; drag or scroll on the value to fine-tune in steps of 0.1. While MIDI Clock sets the tempo, the control shows it dimmed. The free tempo is saved.
15Gain and auto gain
GAIN zooms the display vertically, from 0 to +18 dB in 1 dB steps, so quiet material fills the lanes. It changes only what you see, never the audio. Drag or scroll on it, use its buttons, or press +/− or ↑/↓. Double-click or double-tap resets it to 0 dB.
AUTO, next to it, turns on auto gain. The button lights, the value turns green, and the gain moves in 3 dB steps so the loudest peak fills the top 3 dB: out as soon as a peak goes past the edge of a lane, and in at a bar line once the peaks have stayed low for 10 seconds. Setting the gain by hand turns auto gain off.
Faint reference lines mark where 0 dBFS and −6 dBFS land after the gain, joined by −12 dBFS from +4 dB of gain and −18 dBFS from +10 dB, so you can still read levels. A peak beyond the edge of a lane is cut off with a grey marker. Grey, not red, because it is the display that overshoots, not your audio that clips.
16Waveform modes
WAVE, or the W key, switches between three ways of drawing:
- STD
- A thin line through the signal. The lightest to draw, and the clearest for low frequencies and single cycles.
- PRECISE
- Fills every peak, so nothing between two pixels is lost. The default, and the best view of transients and envelopes.
- DJ
- Like PRECISE, with every column coloured by frequency: lows red, mids green and highs blue, mixed so the strongest band sets the hue. Kicks and bass glow red, hi-hats blue. The bands split at about 200 Hz and 2.5 kHz.
The outline of the waveform is the same in PRECISE and DJ; only the colour differs.
17Waveform colour
In Settings, choose the colour of the waveform in STD and PRECISE: Teal (the default), Cyan, Blue, Violet, Pink, Amber, Yellow or Grey. Green is kept for the write head. In the plugin, each instance remembers its own colour, so you can tell instances apart at a glance.
18Grid, lanes and labels
- Bar lines are bright, beat lines darker, and finer subdivisions fainter still. The grid gets finer as you zoom in, down to sixty-fourth notes.
- Bar numbers run along the bottom. Zoomed in, the labels read bar.beat, and the left edge always says which beat the view starts in.
- The grid resolution, in the bottom-right corner, reads like
1/16 · 125 ms: the note value between the finest lines and its length at the current tempo. - Lanes are labelled L and R, with faint reference lines labelled in dBFS.
- The write head is the green line where new audio is drawn. A small gap in front of it erases the previous pass.
19Zoom
Zoom in on any part of the window to see detail, while the sweep keeps running:
- Drag across the scope to zoom to that part.
- Scroll up or down to zoom around the pointer, or pinch on a trackpad or touchscreen.
- Scroll sideways, or hold Shift and scroll, to move the view.
- Double-click the scope, press Esc, or click the × on the zoom strip to reset.
While zoomed, the zoom strip shows the whole window, the part in view and the write head. Drag on it to move the view, round past either end, or click outside the part in view to centre it there.
20Measurement ruler
Drag with the right mouse button, a two-finger click or Control-click, or hold a finger still for half a second and then drag, to draw a ruler on the scope. While you hold it, a readout next to the pointer shows the ruler's width as:
| ms | The length in milliseconds. |
| samples | The length in samples at the current sample rate. |
| frequency | The frequency whose period is that length, in Hz. |
| note | The nearest note and how many cents off it is, such as A3 +0 ct. Middle C is C3, as in Ableton Live. |
| length | The musical length, such as 0.75 beat · 3/16 or 4.00 beats · 1 bar. |
Measure from one peak to the next to find the pitch of a bass note, or from the grid to a transient to see how late it is. The ruler reads the time axis as shown and goes away when you let go.
21Latency and Visona Sync
Some DAWs, Ableton Live among them, report the same playhead to every plugin on a track, including plugins placed after plugins with latency. The audio reaching Visona is then late by that latency, and the waveform lands after the grid. Visona Sync fixes this.
Visona Sync is an instrument that writes a short impulse at the start of every bar. The DAW aligns a sidechain with the main input of the plugin it feeds, so the impulse arrives exactly as late as the audio. Visona measures how far after the bar line it arrives, and draws the audio that much earlier.
- Add Visona Sync on an instrument track. No MIDI clip is needed.
- In Visona, choose the Sync track as the sidechain input. In Live, pick Post FX.
- Press Play. From the first bar line the status bar shows the measured latency, such as SC +98.7 ms; SC ... means the sidechain is on but no impulse has arrived yet.
Visona keeps the latency it measured. If you add or remove plugins with latency, the new value takes over after two bars and the sweep starts over. One Visona Sync track can feed every Visona instance in the project.
Reaper: set Visona's track to 4 channels and send the Sync track to channels 3/4. Bitwig Studio: choose the Sync track as the sidechain in Visona's device header.
Route nothing but Visona Sync to the sidechain: any peak above −20 dBFS counts as a bar impulse. If Reduced Latency When Monitoring is on in Live, keep the Sync track unarmed.
22Visona Sync with the app
The app allows for its own input latency, but not for what lies between your DAW's MIDI Clock and the audio reaching the interface: the DAW's output latency, clock delay settings and the interfaces on the way. Visona Sync measures that too, if its impulse comes in on an input of its own.
- In your DAW, add Visona Sync on an instrument track and send that track straight to a free output of your interface, such as 3/4, not to the master. Keep it off your speakers: it is a click on every bar.
- Connect that output to a free input of the interface Visona listens to, with a cable or the interface's loopback routing (TotalMix on an RME interface, for example).
- In Visona's Settings, set Visona Sync to that input.
- Start playback with MIDI Clock going to Visona. From the first bar line the status bar shows the offset, such as SC +12.3 ms.
The impulse must reach the input exactly as Visona Sync writes it. Put no effects after Visona Sync on its track, and don't route the track through the master, a group or a return: effects there can delay, smear or turn down the click, and on the master it would also be mixed into your music. Leave the track's volume at 0 dB, since a peak below −20 dBFS doesn't count as an impulse.
Ableton Live: on the Sync track, set Audio To to Ext. Out and choose the output pair below it, such as 3/4. Reaper: in the Sync track's routing, turn off Master send and add a hardware output to the free pair. Bitwig Studio: set the Sync track's output to an output bus for the free pair, added under Settings → Audio.
Nothing is measured in FREE mode. The song must be in 4/4, and the offset must be less than half a bar.
23Diagnostics overlay
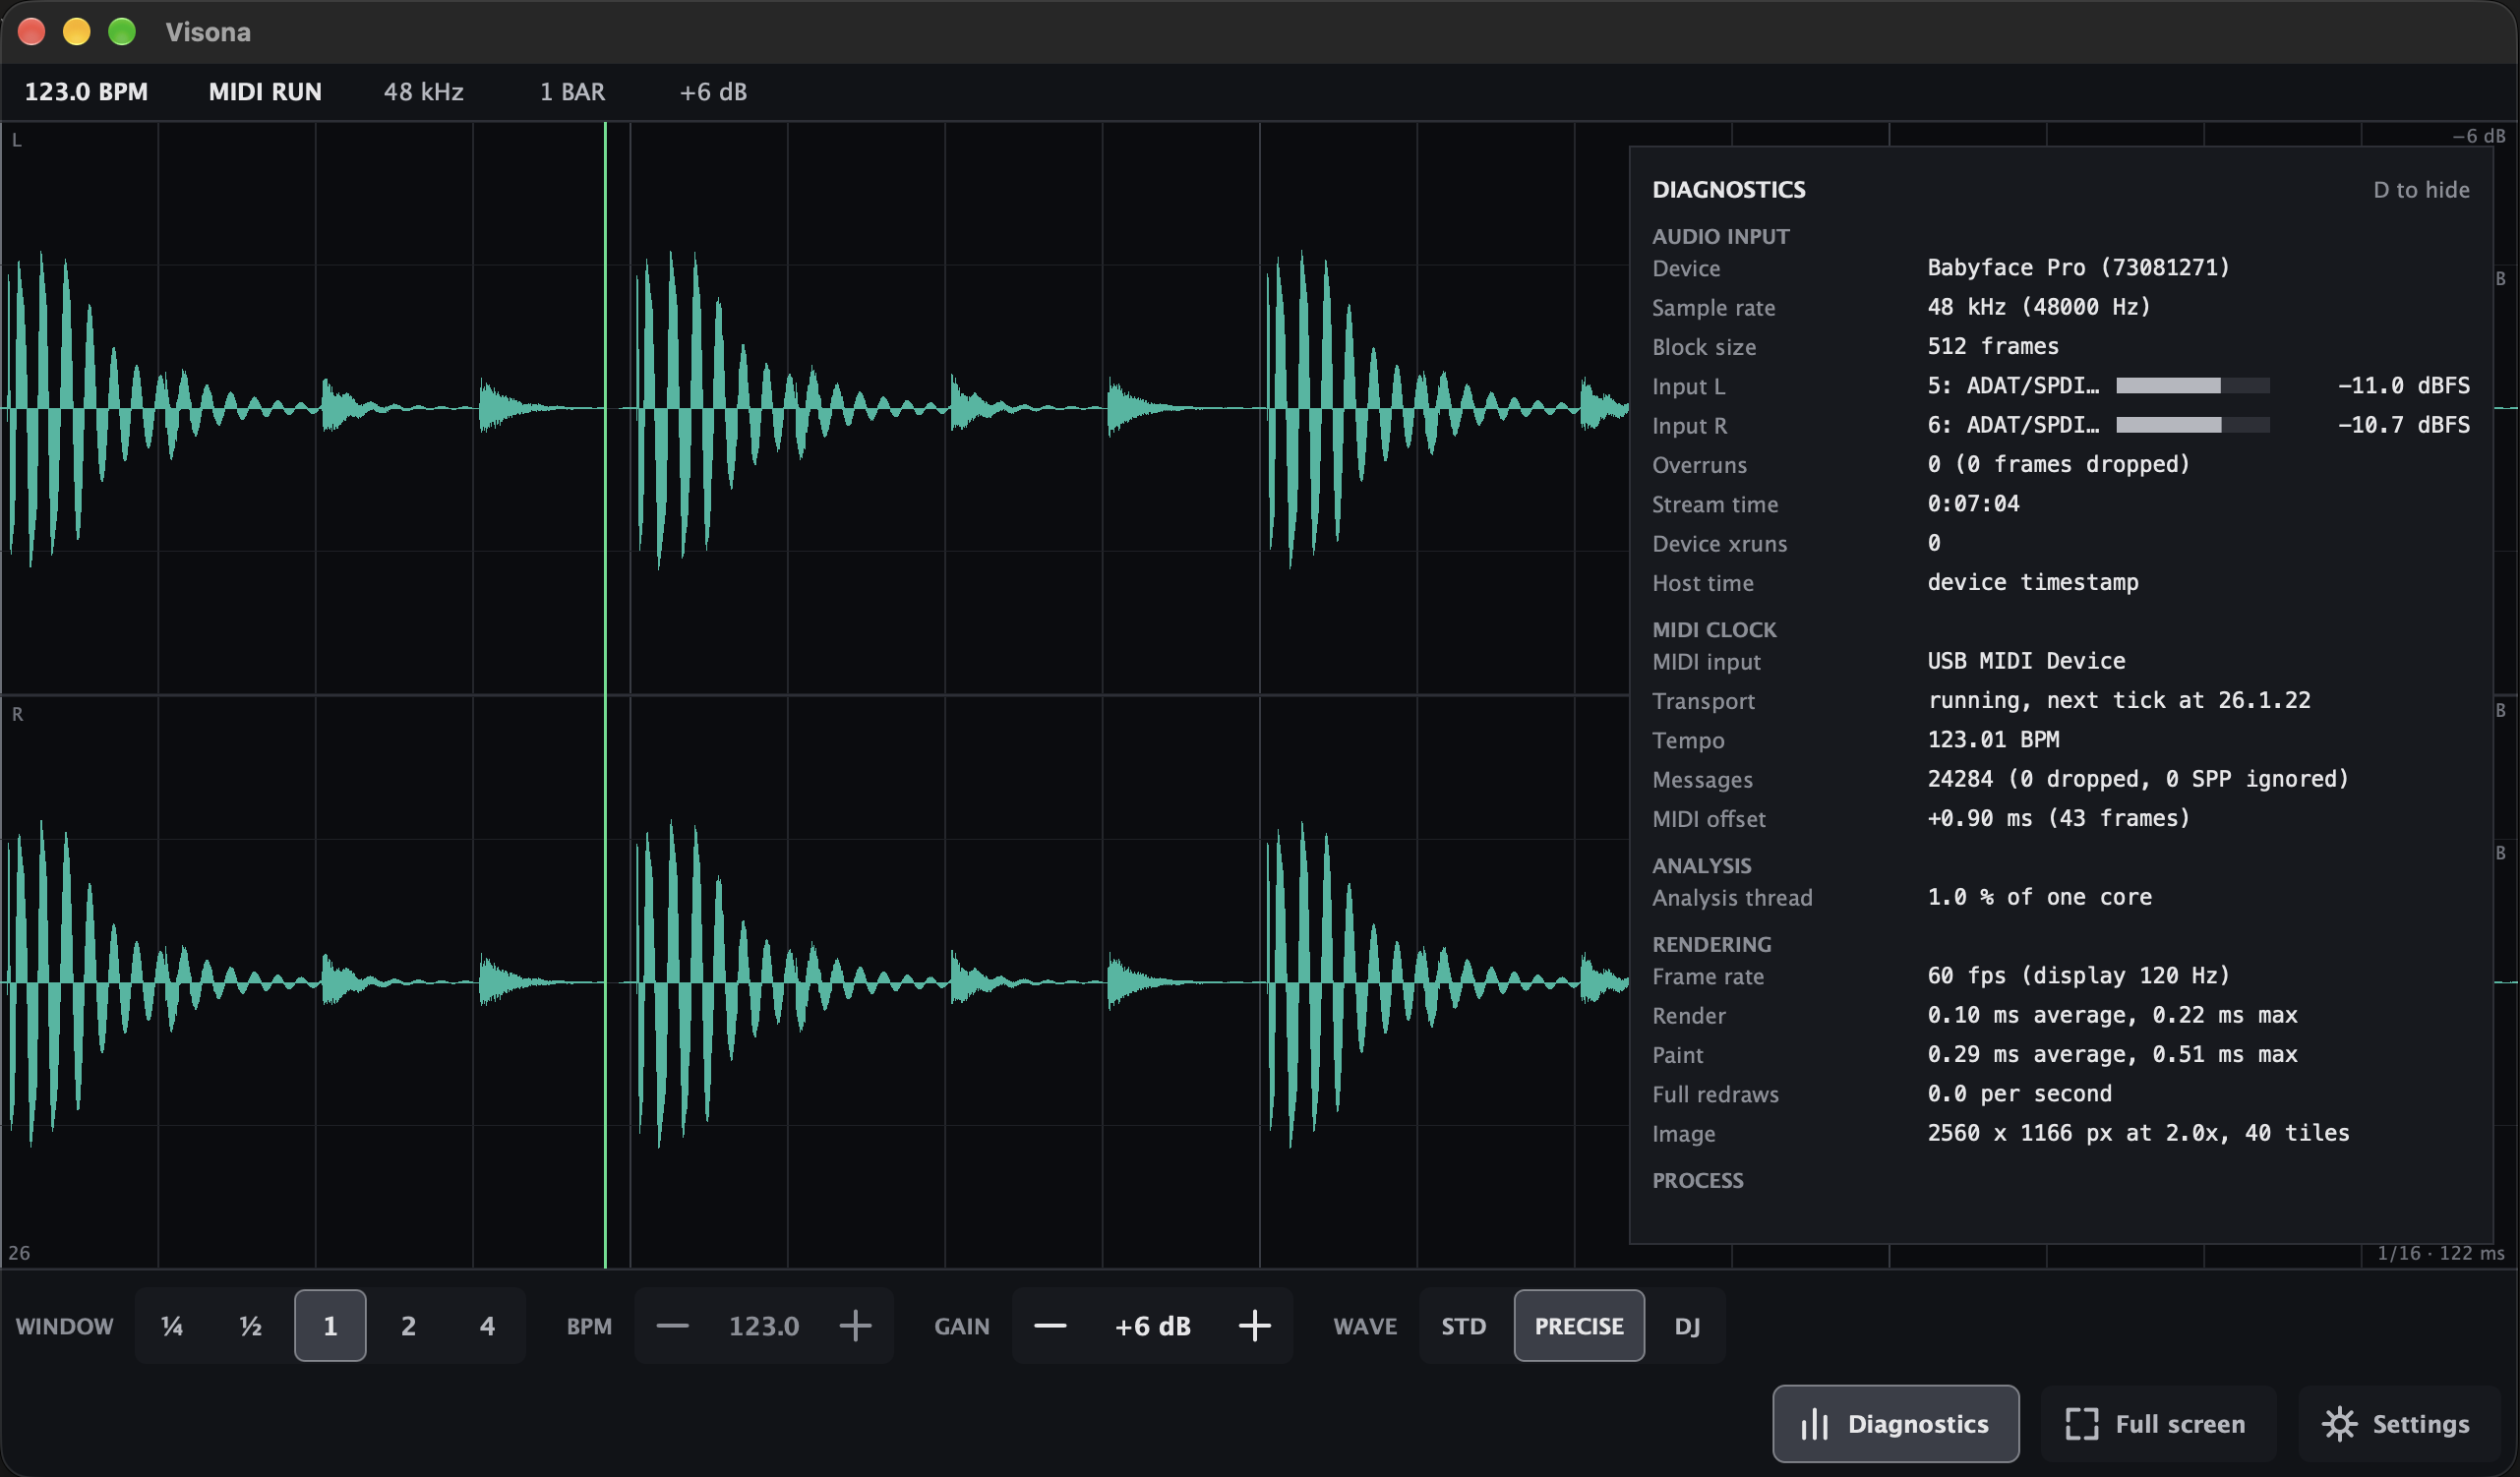
Press D, or the Diagnostics button, for a panel of technical readings: the audio device, sample rate, block size and level per input, overruns and device xruns, MIDI Clock messages and timing, the Visona Sync measurement, analysis load, frame rate and render times, and Visona's CPU use. Include a screenshot of it when you report a problem.
24Full screen and kiosk mode
In the app, F or the Full screen button toggles full screen. On a Raspberry Pi installed with install-visona.sh, Visona starts full screen at login in kiosk mode, with the control bar drawn larger for touch. The display can be switched on after boot, turned off and on, or changed to another resolution, and Visona follows. To quit kiosk mode from SSH, run pkill Visona.
25Touchscreen
Visona works with a multitouch screen, for example on a Raspberry Pi:
- A tap works as a click. Double-tap the gain to reset it, or the scope to reset the zoom.
- Drag across the scope to zoom to that part; pinch to zoom and move the view with your fingers.
- Hold a finger still on the scope for half a second, then drag, to draw the measurement ruler.
- Hold a finger still on a control for half a second to see its tooltip.
- Tap outside the settings panel to close it.
On Raspberry Pi OS, install-visona.sh turns off the desktop's touch-to-mouse emulation so pinch reaches Visona; it takes effect after a reboot. See the kiosk guide for details.
26Keyboard and mouse
| Key | Action | Where |
|---|---|---|
| Space or P | Pause, Resume or Run free | App |
| 1 – 5 | Window ¼, ½, 1, 2 or 4 bars | App |
| + − or ↑ ↓ | Gain up or down 1 dB | App |
| W | Next waveform mode | App |
| F | Full screen | App |
| Cmd+, | Settings | App |
| D | Diagnostics overlay | App and plugin |
| Esc | Close Settings, or reset the zoom | App and plugin |
| On the scope | Action |
|---|---|
| Drag | Zoom to the selection |
| Scroll, pinch | Zoom around the pointer |
| Scroll sideways, Shift+scroll | Move the zoomed view |
| Double-click | Reset the zoom |
| Right-drag, Control-drag, two-finger click and drag | Measurement ruler |
27Troubleshooting
| Problem | What to try |
|---|---|
| NO AUDIO INPUT | Choose the audio device in Settings. On macOS, allow microphone access under System Settings → Privacy & Security → Microphone. On Linux and the Pi, put the interface in class compliant mode. |
| The scope runs but stays flat | Check Left input and Right input in Settings, and the input levels in the diagnostics overlay. |
| MIDI CLOCK LOST or no tempo | Check that the DAW sends MIDI Clock to the chosen MIDI input, and that the DAW is playing. |
| The waveform is off the grid | In a DAW, use Visona Sync on the sidechain. With the app, use Visona Sync on an input. |
| The plugin doesn't show up | Check the install folder, clear the quarantine flag and sign the bundle on macOS, unblock the zip on Windows, and rescan in the DAW. |
| The scope stops updating in a DAW | Note the status bar and the diagnostics overlay, then close and reopen the plugin window. Report it with those details. |
28Conclusion
Thanks for trying Visona. It is young, and it gets better with every report of what works, what doesn't and what you miss. Open an issue on GitHub, and include a screenshot with the diagnostics overlay when something goes wrong.